New: T-TCモードとそのスロット選択をサポートしました
AR-DV10/AR-DV1 メモリデータ編集アプリの使いかた
ご案内
このアプリは、ウェブブラウザで動作し、AR-DV10またはAR-DV1受信機のメモリチャンネルデータを編集できます。
アプリのページを開いたあとは、ブラウザ内でのみ動作します。動作にあたっては、データ内容の通信を行わず、ウェブサーバーはデータ処理を行いません。
注意:このアプリはウェブブラウザ内で動作しますので、ブラウザで「ページを更新」すると読み込んでいたデータは初期化され失われますのでご注意ください。
保証の否認と免責について
このアプリは、エーオーアールによって「現状のまま」提供されるものであり、いかなる保証も提供されません。
エーオーアールは、このアプリについて、アップデート、修正またはサポートをする義務を負わないものとします。
環境条件
次のウェブブラウザの最新バージョンをお使いください。
- Google Chrome - Windows (推奨)
次のブラウザは環境により使用できる場合があります。
- Google Chrome - macOS
- Safari - macOS
- Microsoft Edge - Windows
- mobile Google Chrome - Android, iOS
- mobile Safari - iOS
注意:Internet Explorerでは動作しません。
注意:iOSでお使いの場合:iOSの制約のため、保存ファイル名を指定しても "Unknown.csv" や "Unknown.pdf" などのファイル名になる場合がありますのでファイル管理アプリやSDカードにコピーするときに半角英数字8文字以内(拡張子は.csv)の適切なファイル名に変更してお使いください。
機能
1.メモリデータ編集
- 受信機でSDカードにバックアップしたメモリチャンネルファイル(memch.csv)を読み込んで、内容を編集でき、新しいファイルに保存できます。
- system.csvファイルを読み込んで、これに含まれるメモリチャンネルデータを元に新しいメモリチャンネルファイルを保存できます。
- 新規に未登録の状態から内容を編集することもできます。
- 新しいファイルのファイル名は、"mc"+YYMMDD(作成日の西暦年下2桁、月2桁、日2桁)(拡張子.csv)が初期値ですが、保存時に半角英数字8文字以内で変更もできます。(例:mc180420.csv)
2.AR-DV10・AR-DV1間のメモリデータの変換
- ファイルを保存するときに、機種を選択できます。互換性のない項目は初期値が設定されます。
3.周波数リストファイルから連続チャンネルを登録
- 1行以上の周波数リストファイル(周波数とタイトルのカンマ区切りテキストファイル)を使用して、連続する未登録チャンネルに、その周波数とタイトルのチャンネルを一括登録できます。他の項目は初期値用テンプレートファイルの内容を使用します。(同じメモリバンク内に限ります。)
4.開始周波数とステップから連続チャンネルを登録
- 開始周波数とステップ周波数を指定して、連続する未登録チャンネルに、ステップ周波数の間隔で指定数のチャンネルを登録できます。他の項目は初期値用テンプレートファイルの内容を使用します。(同じメモリバンク内に限ります。)
5.初期値用テンプレートファイル作成
- 連続チャンネル登録時に使用するテンプレートファイルを作成できます。
- 00番の内容のみが使用されます。複数行を登録した場合は、使用したい行を00番に入れ替えて新しいファイルに保存してお使いください。
- 新しいファイルのファイル名は、"tp"+YYMMDD(作成日の西暦年下2桁、月2桁、日2桁)(拡張子.csv)が初期値ですが、保存時に半角英数字8文字以内で変更もできます。(例:tp180420.csv)
備考
- AR-DV10用、AR-DV1用メモリチャンネルファイルは、それぞれの機種でのみメモリチャンネルデータとして受信機に読み込むことができます。
- 初期値用テンプレートファイルとして作成したファイルは、メモリチャンネルデータとして受信機に読み込むことはできません。
- 初期値用テンプレートファイルの代わりに、メモリチャンネルファイルを使用すると、そのBK00-CH00の内容をテンプレートとして使用します。
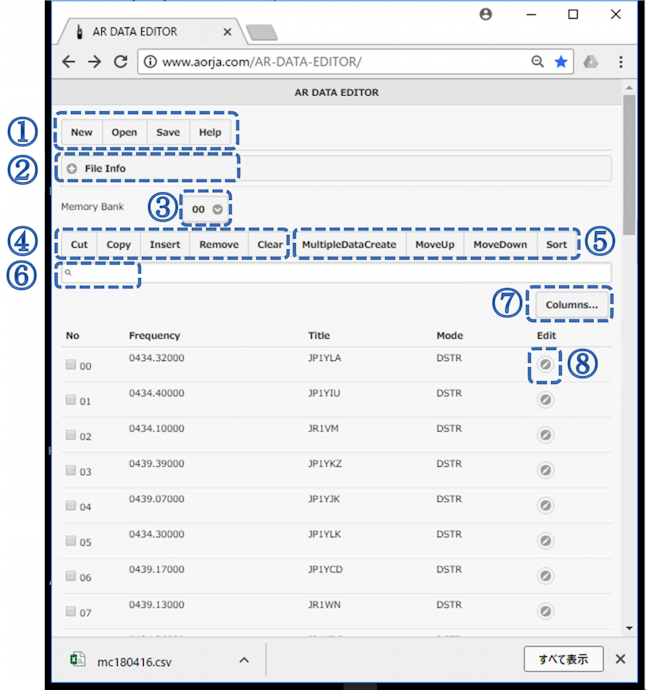
ボタン等の説明

[New](新規)
... 新規に未登録の状態からメモリチャンネルファイル(または、初期値用テンプレートファイル)を作る
- [New]をクリック。
- FileType(ファイルタイプ)(Memory Channel File、または、Template)を選択。
- Model(機種)(AR-DV1、または、AR-DV10)を選択。
- [Create]をクリック
[Open](開く)
... 受信機でSDカードにバックアップしたメモリチャンネルファイル(memch.csv)を読み込む
- [Open]をクリック。
- 目的のファイルを選択して開く。
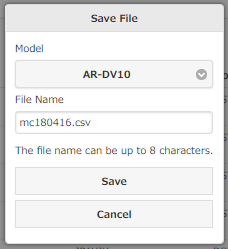
[Save](保存)
... 現在の内容を新しいファイルに保存する
- [Save]をクリック。
- Model(AR-DV1、または、AR-DV10)を選択。
- File Name(ファイル名)を確認。(変更も可能です。半角英数字8文字以内。拡張子は csv )
- ファイルが、ダウンロードされます。(環境によっては、新しいウインドウに表形式で表示される場合がありますが、それをファイルに保存(拡張子は csv)してお使いください。)
ファイルの保存場所は環境によりますが一般的にはブラウザでの「ダウンロード」と同じです。
[Help](ヘルプ)
... ヘルプページを開く
- [Help]をクリック。
- ヘルプページが開きます。
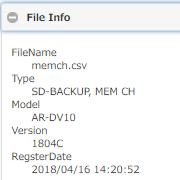
[(+) File Info](+ファイル情報)
... 読み込んだファイルの情報を表示
- [(+) File Info] 行をクリック。
- 表示部分が開いて、読み込んだファイルの情報を表示します。
- 表示部分をたたむこともできます。[(-) File Info](-ファイル情報) 行をクリック。
Memory Bank [00 (v)]
... メモリバンクを切り替える

- 数字部分をクリックして、目的のメモリバンク番号を選択する。
[Cut](カット)
... 別の位置に挿入(Insert)するために、選択(Noにチェック)したチャンネルをカットする
→[Insert](挿入)
... カットしたチャンネル内容を選択(Noにチェック)したチャンネル番号に挿入(Insert)する(上書きされません)
- 目的のチャンネル番号(No)にチェックをつける。(複数のチャンネル番号にチェックをつけることもできます。挿入先のメモリバンクに同数の未登録チャンネルが必要です。)
- 「Selected」(選択された)表示を確認して[Close]をクリック。
- 挿入したい位置(異なるメモリーバンクも可)のチャンネル番号(No)1つにチェックをつける。
- [Insert](挿入)をクリック。(カットしたチャンネル内容が挿入され、もとのチャンネル番号は詰められて、同じメモリバンクの後方のチャンネル番号が未登録になります。)
[Copy](コピー)
... 別の位置に挿入(Insert)するために、選択(Noにチェック)したチャンネルをコピーする
→[Insert](挿入)
... コピーしたチャンネル内容を選択(Noにチェック)したチャンネル番号に挿入(Insert)する(上書きされません)
- 目的のチャンネル番号(No)にチェックをつける。(複数のチャンネル番号にチェックをつけることもできます。挿入先のメモリバンクに同数の未登録チャンネルが必要です。)
- 「Selected」(選択された)表示を確認して[Close]をクリック。
- 挿入したい位置(異なるメモリーバンクも可)のチャンネル番号(No)1つにチェックをつける。
- [Insert](挿入)をクリック。(コピーしたチャンネル内容が挿入されます。もとのチャンネル番号の内容はそのままです。)
[Remove](削除)
... 選択(Noにチェック)したチャンネルを削除
- 目的のチャンネル番号(No)にチェックをつける。(複数のチャンネル番号にチェックをつけることもできます。)
- [Remove](削除) をクリック。(選択(Noにチェック)したチャンネルを削除して、チャンネル番号は詰められて同じメモリバンクの後方のチャンネル番号が未登録になります。)
注意:取り消し(Undo)はできません。
[Clear](消去)
... 選択(Noにチェック)したチャンネルを削除
- 目的のチャンネル番号(No)にチェックをつける。(複数のチャンネル番号にチェックをつけることもできます。)
- [Clear](消去) をクリック。(選択(Noにチェック)したチャンネルが未登録になります。)
注意:取り消し(Undo)はできません。

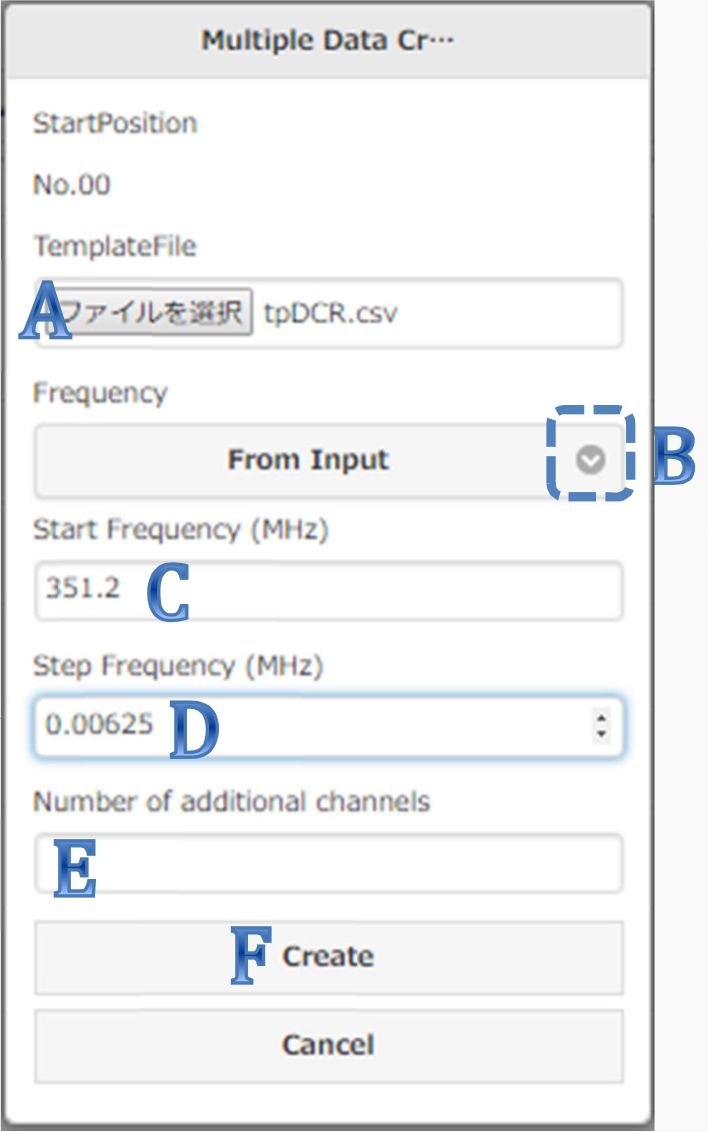
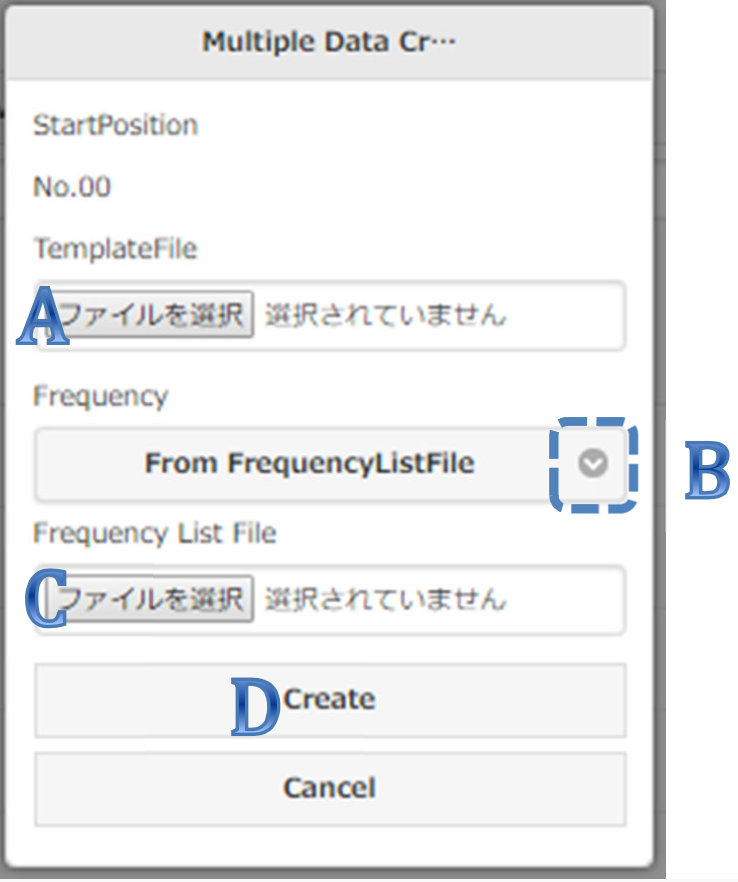
[MultipuleDataCreate](複数データ登録)
... 選択(Noにチェック)したチャンネルから初期値用テンプレートファイルを使用して複数の連続チャンネルを登録(周波数リストファイルから登録、または、開始周波数とステップから登録)
- 登録したい位置のチャンネル番号(No)1つにチェックをつける。
そのチャンネル番号から連続する(同じメモリバンク内の)未登録のチャンネルに登録できます。 - [MultipuleDataCreate](複数データ登録)をクリック。
- TemplateFile(テンプレートファイル)欄で初期値用テンプレートファイルを選択する。
- Frequency(周波数)(From frequencyListFile(周波数リストファイルから)、または、From Input(入力値から))を選択。
- - 周波数リストファイルから登録する場合
Frequency List File欄で周波数リストファイルを選択して、[Create]をクリック。
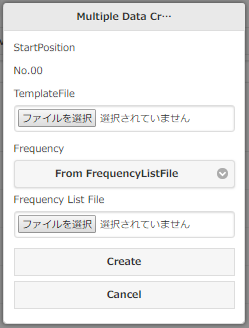
- 開始周波数とステップから登録する場合
Start Frequency(MHz)(開始周波数)、Step Frequency(MHz)(ステップ周波数)、Number of additional channels(登録チャンネル数)を半角数字で入力して、[Create]をクリック。
例:開始周波数(MHz) 351.2、ステップ周波数(MHz) 0.00625、登録チャンネル数 30

[MoveUp](上に移動) [MoveDown](下に移動)
... 選択(Noにチェック)したチャンネル内容をすぐ上(または、下)に移動
- 移動したいチャンネル番号(No)にチェックをつける。
- 上に移動したい場合は[MoveUp]をクリック。
下に移動したい場合は[MoveDown]をクリック。
[Sort](ソート)
... メモリバンク内でチャンネル内容の周波数とモードでソート
- [Sort]をクリック。
- 第1優先キーFrequency(周波数)、第2優先キーMode(モード)のソート方向ASC(昇順)、または、DESC(降順)を選択する。(その他の項目や順序は選択できません。)
- [Sort]をクリック。
検索欄
... 周波数、タイトル、モードを部分一致検索で絞り込み表示
- 検索欄に半角文字を入力するつど、部分一致するチャンネルに絞り込み表示します。(特定の項目に限定できません。)

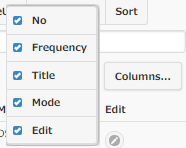
[Columns...](カラム表示)
... No、Frequency、Title、Mode、Editの各カラムを表示、非表示選択
- [Columns...]をクリック。
- 表示するカラムにチェックをつける。
カラム選択部は、それ以外のページ部分をクリックすると閉じます。
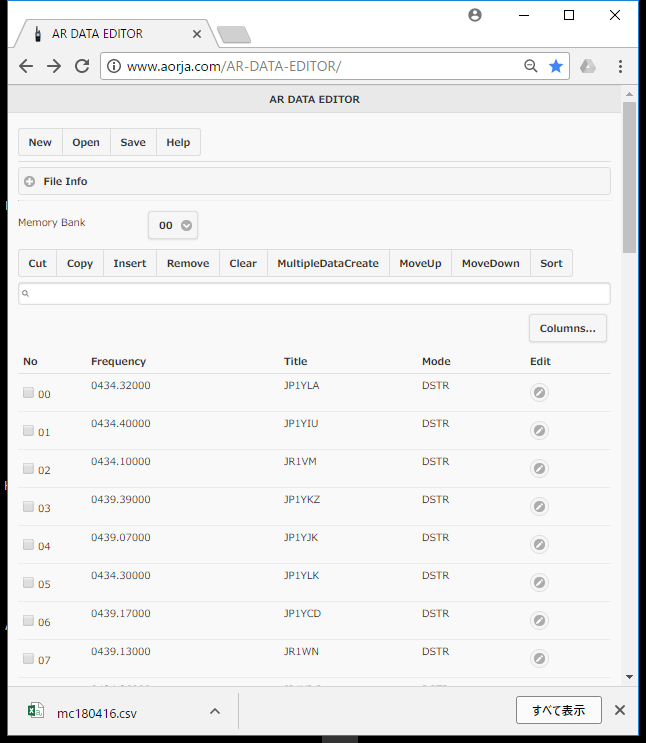
チャンネル内容表示
Memory Bank(メモリバンク)欄で選択したメモリバンク番号のチャンネルを一覧表示します。
- No (チャンネル番号)
- Frequency (周波数、単位:MHz)
- Title (タイトル)
- Mode (モード) ... モードの他に、IF帯域幅、スケルチ等の設定も表示します。
- Edit(編集)ボタン ... そのチャンネル内容を編集する画面を開きます
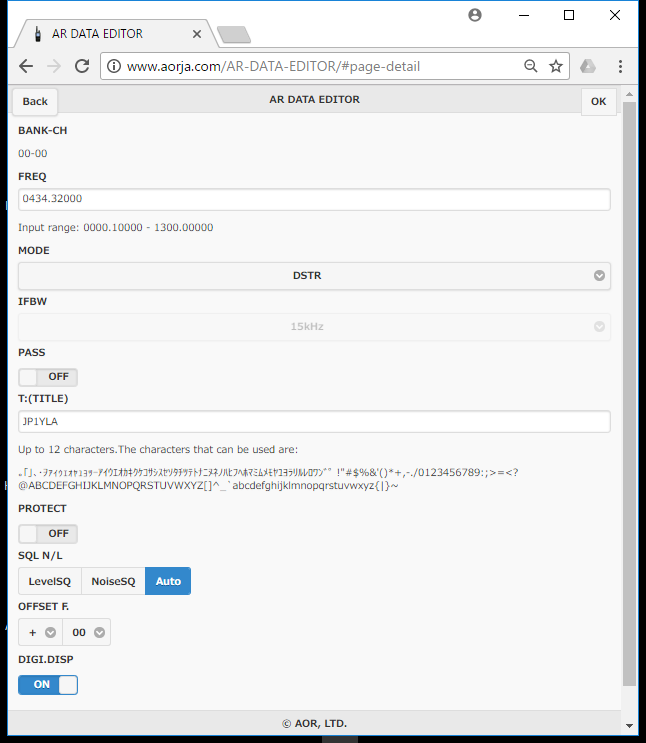
チャンネル内容の編集
編集目的のチャンネル行のEdit(編集)ボタンを押すと、そのチャンネルの内容を変更できます。Mode(モード)によって編集できる項目が表示されます。各項目の内容については受信機と同じです。
変更内容を登録するときは、右上の[OK]をクリック。
(変更せずに戻る場合は、[Back](戻る)をクリック。)
周波数リストファイルの作り方
周波数とタイトルのカンマ区切りテキストを作成します。
- 周波数:MHz単位の半角数字、小数点以下は5桁以内
- タイトル:12文字以内の半角英数字、半角カタカナ(文字種は入力画面に記載)(省略可)
- 改行コード:CR+LF(Windows)、LF(mcacOS、iOS、Android)、CR いずれも可
1行に周波数とタイトルをカンマ区切りで記載して改行してください。
例:351.2,DCR-01ch
351.20625,DCR-02ch
351.2125,DCR-03ch
一度に登録できるチャンネル数は、登録先のメモリーバンクの連続する未登録チャンネル数までです。それを超える行数の周波数リストファイルは使用できません。
主なError(エラー)表示
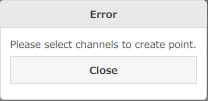
・Please select channels to xxxx.[Close]
(xxxxのためにチャンネルを選択してください)
・[Save File] The file name can be up to 8 characters.
(ファイル名は8文字以内です)
・[Save File] File name is too long.
(ファイル名が長すぎます)
・Error has occurred. Please check the following items.
(次の項目を確認・修正してください)
・* FREQ is out of range.
(周波数が範囲外です)
・* Characters that cannot be used are included.
(使用できない文字があります)
・* Please check XXXX value.
(XXXX項目の値を確認・修正してください)
©2018-2019 AOR, LTD.
Ver.1.1.7(20191108)